Easy No-Knead French Crusty Bread
This easy no knead French crusty bread is is perfect for anyone who loves rustic artisan bread but doesn’t want the fuss of kneading or shaping.There is something special about homemade bread with a beautifully crisp, golden crust and a soft, chewy centre.
With just four simple ingredients and a little patience, you can make a gorgeous loaf with a crackly crust and a lovely open crumb. The secret is a slow overnight rise and baking the dough in a preheated Dutch oven, which traps steam and helps create that wonderful crust. This is not a complicated bread recipe, no fancy ingredients or sour dough starter needed.
Best of all, there is no complicated shaping involved. Once the dough has risen, simply tip it straight into your hot Dutch oven and let the oven do the rest.
This post may contain affliate links. If you click through and make a purchase, I earn a small revenue. They are marked with * for your reference
You will need
- 500 g strong white bread flour
- 375 ml water, cool or at room temperature
- 10 g fine sea salt
- ¼ teaspoon instant dried yeast* (approximately 1 g) you can buy any instant yeast from the supermarket, but I also like this one, which works really well and is good quality
1. Mix the dough
In a large mixing bowl, combine the flour, salt and dried yeast. Pour in the water and mix with a wooden spoon until all the flour is incorporated.
The dough will look sticky, rough and a little messy. This is exactly what you want. There is no need to knead it or work it until smooth.
Cover the bowl with a lid, cling film or a clean tea towel.
2. Leave to rise overnight
Leave the dough at room temperature for 12–18 hours.
During this time, the yeast will slowly develop the flavour and structure of the bread. When ready, the dough should be bubbly, airy and noticeably risen.
If your kitchen is particularly cool, it may need a little longer.
3. Preheat the oven and Dutch oven
When you are ready to bake, preheat your oven to 240°C conventional or 220°C fan.
Place your empty Dutch oven, including its lid, inside the oven and allow it to heat for at least 30 minutes. Getting the pot properly hot is important for achieving a crisp, golden crust.
4. Tip the dough straight into the hot Dutch oven
Carefully remove the hot Dutch oven from the oven and take off the lid.
Gently loosen the dough from the sides of the mixing bowl. There is no need to shape it, knead it again or turn it out onto a floured work surface.
Simply tip the dough straight into the hot Dutch oven. It will settle into a rustic, uneven shape as it bakes, giving the finished loaf its lovely homemade character.
If you prefer, you can use a piece of baking parchment to help transfer the dough, provided it is rated for the baking temperature.
Replace the lid and carefully return the Dutch oven to the oven.
5. Bake until golden and crusty
Bake with the lid on for 30 minutes. This traps the moisture released by the dough, creating steam that helps the bread rise and develop its crust.
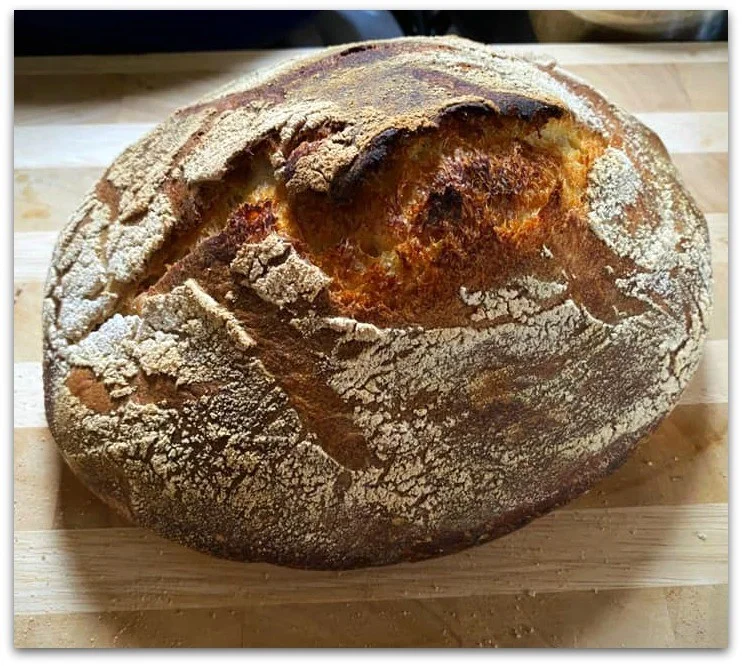
After 30 minutes, remove the lid and continue baking for another 15–20 minutes, until the loaf is a deep golden brown.
For a really crisp crust, don’t be tempted to take it out too early. A darker golden colour will give you that satisfying artisan-style finish.
6. Let the bread cool
Carefully remove the loaf from the Dutch oven and transfer it to a wire rack.
Leave it to cool for at least an hour before slicing. As tempting as it is to cut into freshly baked bread, allowing it to cool helps the crumb finish setting and gives you a better texture.
Tips for making this bread recipe work
Be patient with the overnight rise. The long fermentation is what gives this simple bread its flavour and airy texture.
Don’t worry about the shape. Because the dough goes straight into the pot, every loaf will look a little different. That’s part of the charm of rustic homemade bread.
Preheat the Dutch oven properly. A thoroughly heated pot helps the dough rise and encourages a crisp crust.
Bake it until deeply golden. The uncovered baking time is essential for drying and crisping the crust.
Let it cool before slicing. This helps prevent a gummy interior and gives the loaf its best texture.
This bread doesn’t keep for long, as it has no preseratives or artificial ingredients in it, to give it a long shelf live. To be honest, it’ll get eaten fast, but if you have leftover bread going stale, you can use it for breadcrumbs, french toast, or do like the French do, and soak it lightly in water, then warm it in the oven to bring it back to one more round of life. It can be frozen and defrosted as well.
So, why not make your own French style bread? It’s very little work for a lot of reward.


 This ADHD Mum was born when I hung up my parenting blogger hat and decided to share life as I see it through the lens of someone with late diagnosed ADHD. You will find ADHD & mental health content, life as I ride the menopause rollercoaster, food, because food is life, and because we love them, all things cat.
You can reach out to me at info@thisadhdmum.com or find us on social media
This ADHD Mum was born when I hung up my parenting blogger hat and decided to share life as I see it through the lens of someone with late diagnosed ADHD. You will find ADHD & mental health content, life as I ride the menopause rollercoaster, food, because food is life, and because we love them, all things cat.
You can reach out to me at info@thisadhdmum.com or find us on social media